Tuesday, July 2, 2013

Sewing Pointe Shoes Part 2

Bonjour readers!
Today I'll be finishing part two of sewing pointe shoes. As you can guess, this is the ribbons, and depending on how much preparation you've made, this can be an extremely fast process.
                   Techniques Needed: Basic sewing skills               Supplies List:
                                                                                                 Pointe shoes (with elastic attached)
             Pointe shoe Ribbon (pre-cut and burned)
             Pins and Needles
             Thread
             Scissors
        * Optional Supplies:
             Pin cushion
      
 Step 1: After you have measured and burned your ribbon (to burn I always use a candle), double check the lengths to make sure they fit properly around you ankle. Also, be certain that you have enough ribbon to double knot it. I know what it's like to realize you have short ribbon after you've sewn everything.


Step 2: Take your ribbons and pin them directly across from each other on both sides of the shoe. Since my shoes have cross ways elastic, I put my ribbon right behind it(as in next to). If you sewed your elastic the traditional way, then place your ribbon right around the center arch seem.
            When sewing, I like to give myself about a quarter of an inch tail underneath of my sewing line because it gives me relief of how much tension I put on the ribbon.


Step 3: Like sewing the elastics, I highly recommend using the back stitch in sewing the ribbon as well. You can never go wrong when using this stitch. Also, remember to double thread your needle and triple knot your thread.
           Other people like to do a whip stitch around the edges of their ribbon, but that makes it much more time consuming than it needs to be.


Step 4: After your ribbons are both securely sewn, tie the shoe on you just to make sure everything is just right. If you find that your ribbons are too short, a simple extension can be sewn on your ribbons. Take some scrap lengths and sew them to the attached ribbon with a back stitch. even if the type of ribbon is different, it won't show since you tuck the ends in.
            Enjoy your completed shoes!

I hope these last two posts were very helpful to you now or will be in the future. I will later post some techniques for breaking in shoes that I'm sure you'll find useful.
Thanks again for reading and please leave a comment. I love feedback.

Your writer,

Bobfransisco Bob

Friday, June 28, 2013

Sewing Pointe Shoes Part 1

Hello readers!
Hope everyone had a good first week of summer.
Today I'll be sharing with you guys how to sew your pointe shoes. Yes, this is a very restricted audience, but next time I'll be more universally fun (if that makes sense).
Every time from now on when I have a post that requires different skills, you will find a list of techniques required. If you ever find yourself in trouble with figuring something out (ex. sewing) please leave a comment so I can make a post to teach this technique. Along with the listed techniques required, you'll find bellow it a list of supplies. The fundamentals are listed first, then optional supplies will also be listed with an asterisk.
Now lets get started. Here's a list of supplies that will help you prepare:

Techniques needed: basic hand sewing skills                       Supplies List:
                                                                                        Pointe Shoes
    Ribbon (part 2)
    Elastic
    Strong thread
    Needles and pins
    Scissors
     *Optional Supplies:
    Sharpie or fabric marker
    Fabric Glue
    Pin cushion


Step 1: Now that we have the necessary supplies, it's time to start. Before you start sewing, try on your shoe to make that the draw string is pulled tight enough for your preference(sometimes the sewing thread can catch hold of the draw string).


 Step 2: Now it's time to measure and cut your elastic. Some people like to use tape measures, but I like to gauge my length by fitting it to my foot. In this step, leave your shoe on and have both hands free. This is when the marker comes into play. It's not totally necessary, but it is very helpful when pinning. First go to one side of you heel with the elastic resting on the outside of the shoe. Hold your thumb there and make a mark before moving on.
Step 3: There are two ways you can sew your elastic. The first way I'll show you is the most common and popular way to attach them. Like you did with the first side of your heel, take the end of the elastic and hold it on the other side of your heel. Make another mark with your marker of either your cutting line or your sewing line and cut the elastic. It should look like this.( It wasn't cut it in this picture)


The second way, which is what I prefer, is doing it cross-ways. from the point where your elastic is held, take the other end and reach it to the middle arch lines on your shoe. Repeat this for both sides making marks for the sewing or cutting marks.A tip for when you're measuring your elastic is to stretch it a bit so its not comfortably on your foot. There's nothing scarier than a lose shoe. The following picture shows one elastic crossed.


Step 4: After making your marks, take off your shoe and either pin or glue the elastic according to your personal fitting. I prefer to use pins because it's faster and you can try your shoe back on to make sure you pinned it correctly.

Step 5: Now you can sew your shoes. When sewing, I would suggest double threading your needle using a strong cotton thread. Double, triple, quadruple, or even quintuple your knot. At the point of actually sewing, the back stitch is the way to go. If your knot comes out ( which more than likely won't happen) it will stay inter-weaved in the stitch.


Step 6: After sewing both ends, try your shoe back on to make sure that it fits right. Then repeat sewing the other elastic.

Step 5: Now enjoy you sewn shoes! Well, at least the elastics. The ribbons will be shown on the next post.
* I am not an expert, but I am an intermediate level dancer. I have personally tried these techniques and recommend them.

Thanks for reading. If you have any questions, please leave a comment. I would love to hear feedback. Better yet, become a follower!

Yours Truly,

Bobfransisco Bob

Monday, June 17, 2013

Music 8

Hey all readers out there!
I know recently all I've been posting is music, but I promise the next post will not be boring.
To tide you over, here are some recommendations from Eisley's new album Currents. Hope you enjoy them.


Personally, I prefer Blue Fish, but Real world is also very good.

Your writer,
Bobfransisco Bob

Sunday, May 5, 2013

Music 7

Hello everyone!
I'm really excited about Eisley's new album Currents coming out May 28th. They have released two songs as a preview and they are both amazing. Today, I'll share them with you and I hope you enjoy them.


Hope you liked it!
Your writer,
Bobfransisco Bob

Friday, April 26, 2013

Music 6

Long time no type!!!
Bonjour mon amis!
Well, anyway... I hope everyone is doing well.
Sorry this post is just another music suggestion, but things have been crazy for a while.
So Eisley came out with a new EP two Valentine's days ago. I'll post two of them, but I highly recommend listening to the entire EP. It is only five songs so it can't take you more than twenty minutes.
Anyway, here are the suggestions. Enjoy!


I agree the album cover is a little creepy and somewhat gory, but that's far from the personality of their music.


Hope you liked them.

Your inconsistent writer,

Bobfransisco Bob

Wednesday, November 21, 2012

Music 5

Hello Readers!
Happy Thanksgiving to all of you. I hope it will be the best one yet.
Now, to start off the season right, I have some music suggestions for you. Well, I don't really know why that would start the season off right, but.... Okay.


My first video is by a band called The Honey Trees. This is like their best song and I would recommend it to anybody.


My second and last pick is now one of my favorite songs. It's by a band called Sucre( accent on the e). The singer of this band is actually one of the Dupree sisters from Eisley, Stacy King. Hope you enjoy it.


Thanks for listening.

Your author,

Bobfransisco Bob

Monday, August 20, 2012

Nail Palms

Hey Everyone!
     Hope you've been having a great summer.
     Today, I'll be showing you guys how to paint a summer design on your nails. Here's the supplies you'll need.

One bottle of red nail polish(or any kind of base polish that you like)
A black sharpie( or any color that goes with your base color. I just used black since it pops)
A news- papered surface so nail polish doesn't spill everywhere.
A bottle of clear coat polish


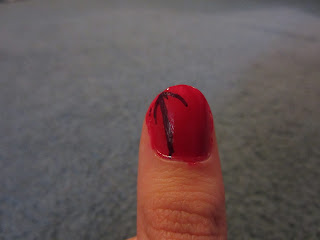
Okay. So here's a picture of the design. I prefer to do this particular design on my toes, so the palms are facing the outside of my feet(but for the example, I will be using my thumb). Sorry the design is chipped.


STEP 1. Put on your first layer of the base coat. Let dry. Then apply second. As you should already know, let dry. After applying both base coats, brush on the clear polish. And should I state the obvious? Might as well. Let dry.

                                                   Sorry, my paint job's a little sloppy.


STEP 2. Take out your sharpie and draw a straight line from bottom to top, leaving about a quarter of an inch space between the edge of your nail and the line.


STEP 3. From the top of your line(or should I say, your palm tree) draw base lines for the branches of your palms.


STEP 4. Continue drawing lines until you have a full palm tree.


                                                      Mine got a little messed up!


STEP 5. Repeat on opposite nail. The rest of my nails were painted red, but you can customize this design however you like.

Hope you liked this. If you have any questions or comments please,well, comment.

Your writer,

Bofransisco Bob

Note: In the original design I put the sharpie palm design on before the clear coat. The only problem with that is that the black bleeds. Also, if you want, you can substitute the sharpie for a nail art pen or black nail polish.