Hey Everyone!
Hope you've been having a great summer.
Today, I'll be showing you guys how to paint a summer design on your nails. Here's the supplies you'll need.
One bottle of red nail polish(or any kind of base polish that you like)
A black sharpie( or any color that goes with your base color. I just used black since it pops)
A news- papered surface so nail polish doesn't spill everywhere.
A bottle of clear coat polish
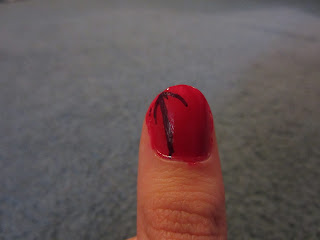
Okay. So here's a picture of the design. I prefer to do this particular design on my toes, so the palms are facing the outside of my feet(but for the example, I will be using my thumb). Sorry the design is chipped.
STEP 1. Put on your first layer of the base coat. Let dry. Then apply second. As you should already know, let dry. After applying both base coats, brush on the clear polish. And should I state the obvious? Might as well. Let dry.
Sorry, my paint job's a little sloppy.
STEP 2. Take out your sharpie and draw a straight line from bottom to top, leaving about a quarter of an inch space between the edge of your nail and the line.
STEP 3. From the top of your line(or should I say, your palm tree) draw base lines for the branches of your palms.
STEP 4. Continue drawing lines until you have a full palm tree.
Mine got a little messed up!
STEP 5. Repeat on opposite nail. The rest of my nails were painted red, but you can customize this design however you like.
Hope you liked this. If you have any questions or comments please,well, comment.
Your writer,
Bofransisco Bob
Note: In the original design I put the sharpie palm design on before the clear coat. The only problem with that is that the black bleeds. Also, if you want, you can substitute the sharpie for a nail art pen or black nail polish.


