Wednesday, November 21, 2012

Music 5

Hello Readers!
Happy Thanksgiving to all of you. I hope it will be the best one yet.
Now, to start off the season right, I have some music suggestions for you. Well, I don't really know why that would start the season off right, but.... Okay.


My first video is by a band called The Honey Trees. This is like their best song and I would recommend it to anybody.


My second and last pick is now one of my favorite songs. It's by a band called Sucre( accent on the e). The singer of this band is actually one of the Dupree sisters from Eisley, Stacy King. Hope you enjoy it.


Thanks for listening.

Your author,

Bobfransisco Bob

Monday, August 20, 2012

Nail Palms

Hey Everyone!
     Hope you've been having a great summer.
     Today, I'll be showing you guys how to paint a summer design on your nails. Here's the supplies you'll need.

One bottle of red nail polish(or any kind of base polish that you like)
A black sharpie( or any color that goes with your base color. I just used black since it pops)
A news- papered surface so nail polish doesn't spill everywhere.
A bottle of clear coat polish


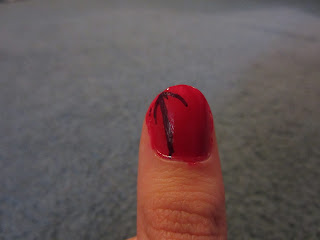
Okay. So here's a picture of the design. I prefer to do this particular design on my toes, so the palms are facing the outside of my feet(but for the example, I will be using my thumb). Sorry the design is chipped.


STEP 1. Put on your first layer of the base coat. Let dry. Then apply second. As you should already know, let dry. After applying both base coats, brush on the clear polish. And should I state the obvious? Might as well. Let dry.

                                                   Sorry, my paint job's a little sloppy.


STEP 2. Take out your sharpie and draw a straight line from bottom to top, leaving about a quarter of an inch space between the edge of your nail and the line.


STEP 3. From the top of your line(or should I say, your palm tree) draw base lines for the branches of your palms.


STEP 4. Continue drawing lines until you have a full palm tree.


                                                      Mine got a little messed up!


STEP 5. Repeat on opposite nail. The rest of my nails were painted red, but you can customize this design however you like.

Hope you liked this. If you have any questions or comments please,well, comment.

Your writer,

Bofransisco Bob

Note: In the original design I put the sharpie palm design on before the clear coat. The only problem with that is that the black bleeds. Also, if you want, you can substitute the sharpie for a nail art pen or black nail polish.

Sunday, June 24, 2012

Music 4

Hello All!
Sorry for not posting in like six months, but it hasn't been the most relaxed year.
Anywho, I have some more music suggestions for you guys. Hope you like them.


                                                       This video is so funny!


This song is what I consider an Eisley classic. It's a song that never gets old. Every time I listen to it, it's like I'm hearing it for the first time.


Well, I hope you liked these. Please comment or poll and I apologize for any incorrect spelling or grammatical errors.

Yours truly,

Bofransisco Bob

Monday, January 16, 2012

The First Five Positions of Ballet

 Hi Everyone!!
 Sorry I haven't posted in forever(and broke my promise). Hopefully you will be satisfied with this post.


What I'm about to teach you is highly explanatory from the title, but to recap, the first five ballet positions(feet. Arms will be in another post). Now, the way I'm going to do this is under each picture I'll put a brief explanation of the step.

                                                          (Sorry, a finger got in the shot)

           Above is first first position. While standing with strait legs and good posture(which you'll want to do for all of the positions) kiss your heals together with you feet and legs turned out.

                                                              SECOND POSITION
 For second position, spread your legs apart about to where your heals are in line with you hips. Legs and feet should also be turned out and strait.


                                                                 THIRD POSITION

In third, you take your right foot's heal, and place it in front of the middle of your arch. Again, feet and legs should be turned out and legs strait.


                                                              FOURTH POSITION
For fourth, take your right foot directly in front of your left foot, making sure your feet are about 3 to 4 inches apart. Also, turn out your feet and have strait, turned out legs.


                                                                FIFTH POSITION
  Lastly, fifth is pretty much a closed fourth. One note about the picture though, make sure the tip of your left big toe meets with the heal of your right foot. And remember to turn out your feet with strait, turned out legs.


Hope that makes sense. If you have and comments or questions, please feel free to post a comment.

Yours truly,

Bobfransisco Bob


Note: Third, fourth, and fifth position can be reversed, by putting the left foot in front in stead of the right.